Citroen C3: Spare wheel / Removing a wheel
 Parking the vehicle
Immobilise the vehicle where it does not obstruct traffic: the ground must be level, stable and non-slippery.
With a manual gearbox, engage first gear to lock the wheels, apply the parking brake, unless it is programmed to be in automatic mode, and switch off the ignition.
With an automatic gearbox, select mode P to lock the wheels, apply the parking brake, unless it is programmed to be in automatic mode, and switch off the ignition.
Check for the fixed illumination of the parking brake indicator lamps in the instrument panel. The occupants must get out of the vehicle and wait where they are safe.
If necessary, place a chock under the wheel diagonally opposite the wheel to be changed. Never go underneath a vehicle raised using a jack; use an axle stand.
 Wheel
with wheel trim
Wheel
with wheel trim
When removing the wheel, first remove the wheel trim by pulling at the valve aperture using the wheelbrace.
When refitting the wheel, refit the wheel trim, starting by placing its aperture in line with the valve and then pushing it into place all round its edge with the palm of your hand.

- Remove the bolt cover(s) using tool 7 (depending on version).
- Slacken the other bolts using the wheelbrace 5 only.
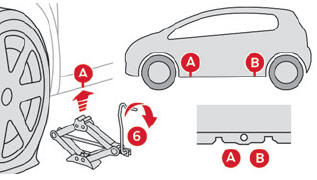
- Place the foot of jack 6 on the ground and ensure that it is directly below the front A or rear B jacking point on the underbody, whichever is closest to the wheel to be changed.
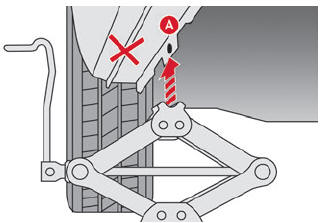
- Extend jack 6 until its head comes into contact with jacking point A or B; contact area A or B on the vehicle must be properly inserted into the central part of the head of the jack.
- Raise the vehicle until there is sufficient space between the wheel and the ground to admit the spare (not punctured) wheel easily.
 Ensure that the jack is
stable. If the
ground is slippery or loose, the jack may
slip or collapse - risk of injury!
Ensure that the jack is
stable. If the
ground is slippery or loose, the jack may
slip or collapse - risk of injury!
Take care to position the jack strictly at one of the jacking points A or B under the vehicle, ensuring that the head of the jack is centred under the contact area of the vehicle. Otherwise, there is a risk of damage to the vehicle and/or of the jack collapsing - risk of injury!

- Remove the bolts and store them in a clean place.
- Remove the wheel.
 Stowing
the damaged wheel
Stowing
the damaged wheel
- To stow an alloy wheel, first remove the wheel trim from the centre of the wheel so that the fastening device (nut and bolt) can be put in place.
- In the case of a "space saver" type spare wheel, the damaged wheel cannot be stowed under the floor. It must be placed in the boot; use a cover to protect the inside of the boot.
 Removing the spare wheel
Unclip the tool storage box (standard spare
wheel).
Slacken the central nut.
Remove the fastening device (nut and bolt).
Lift the spare wheel towards you from the
rear...
 Fitting a wheel
Fitting a
steel or ‘space-saver’ type
spare wheel
If the vehicle is equipped with alloy wheels,
the washers do not make contact with the
steel or ‘space-saver’ type spare wheel...
Other information:
Citroen C3 2016-2026 Owners Manual: Intelligent emergency braking assistance. Active Safety Brake. Malfunction
Intelligent emergency braking assistance If the driver brakes, but not sufficiently to avoid a collision, this system will supplement the braking, within the limits of the laws of physics. This assistance will only be provided if the driver presses the brake pedal...
Citroen C3 2016-2026 Owners Manual: Switching off the engine
Immobilise the vehicle. With the engine at idle, turn the key to position 1. Remove the key from the ignition switch. To lock the steering column, turn the steering wheel until it locks. To facilitate unlocking of the steering column, it is recommended that the wheels be returned to the straight ahead position before switching off the engine...
Categories
- Manuals Home
- 3rd Generation C3 Owners Manual
- 3rd Generation C3 Service Manual
- Refuelling
- AdBlue® (BlueHDi)
- Manual child lock
- New on site
- Most important about car