Citroen C3: Changing a bulb / Front lamps
Model A
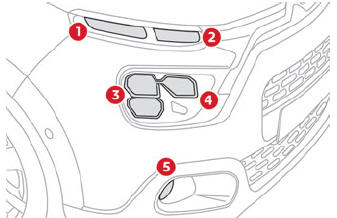
- Daytime running lamps/Sidelamps (W21/5W)
- Direction indicators (PY21W)
- Dipped beam headlamps (LED)
- Main beam headlamps (LED)
- Foglamps (PSX24W)
Model B

- Daytime running lamps/Sidelamps (LED)
- Direction indicators (PY21W)
- Dipped beam headlamps (LED)
- Main beam headlamps (LED)
- Foglamps (PSX24W)
Daytime running lamps/sidelamps
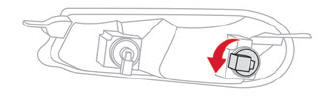
- Turn the bulb holder an eighth of a turn anticlockwise and remove it.
- Remove the bulb and replace it.
Direction indicators
 Rapid flashing of the
indicator lamp for a
direction indicator (left or right) indicates that one of the bulbs on the
corresponding
side has failed.
Rapid flashing of the
indicator lamp for a
direction indicator (left or right) indicates that one of the bulbs on the
corresponding
side has failed.
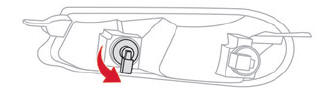
- Turn the bulb holder an eighth of a turn anticlockwise and remove it.
- Remove the bulb and replace it.
 Amber-coloured bulbs must
be replaced
by bulbs with identical specifications and
colour.
Amber-coloured bulbs must
be replaced
by bulbs with identical specifications and
colour.
Foglamps
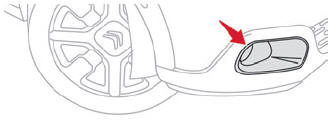
o replace this type of bulb, contact a CITROËN dealer or a qualified workshop.
Integrated direction indicator side repeaters
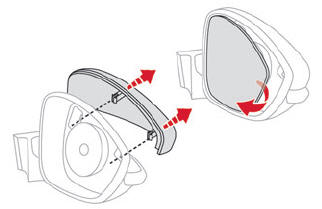
- Insert a flat screwdriver between the door mirror and its base.
- Tilt the screwdriver and use it as a lever to extract the mirror.
- Unclip the shell of the door mirror by pressing on the two retaining clips.

- Press the central tab and remove the side repeater.
- Pull out the bulb holder and replace the faulty bulb.
 For the replacement of
these bulbs, you
can also contact a CITROËN dealer or a
qualified workshop.
For the replacement of
these bulbs, you
can also contact a CITROËN dealer or a
qualified workshop.
 Changing a bulb
In some weather conditions
(e.g. low
temperature or humidity), misting on the
internal surface of the glass of the headlamps
and rear lamps is normal, and will disappear
after the lamps have been on for a few
minutes...
 Rear lamps
Sidelamps (R10W)
Brake lamps (P21W)
Direction indicators (PY21W)
Reversing lamp (P21W) or Foglamp (PR21W)
Changing bulbs
These bulbs are changed from inside the boot...
Other information:
Citroen C3 2016-2026 Owners Manual: Refuelling
Fuel tank capacity: approximately 45 or 47 litres (petrol) or 42 or 50 litres (Diesel). Reserve level: approximately 5 litres. Low fuel level When the low fuel level is reached, one of these warning lamps comes on on the instrument panel, accompanied by an onscreen message and an audible signal...
Citroen C3 2016-2026 Owners Manual: Checking levels
Check all of the following levels regularly in accordance with the manufacturer's service schedule. Top them up if required, unless otherwise indicated. If a level drops significantly, have the corresponding system checked by a CITROËN dealer or a qualified workshop...
Categories
- Manuals Home
- 3rd Generation C3 Owners Manual
- 3rd Generation C3 Service Manual
- CITROËN ConnectedCAM®
- Pairing a Bluetooth® telephone
- Setting the date and time
- New on site
- Most important about car
Copyright © 2026 www.citroenc3.org